![]()
a = 0
Fig. 1.1. The motion diagram for an object moving with a constant velocity.
The acceleration is zero because the velocity is not changing.
KINEMATICS KIT
CONSTRUCTING MOTION DIAGRAMS FOR LINEAR MOTION
When first applying kinematic (motion) principles there is a tendency to use the wrong kinematic quantity--to inappropriately interchange quantities such as position, velocity, and acceleration. Constructing a motion diagram should reduce this confusion and should provide a better intuitive understanding of the meaning of these quantities.
A motion diagram represents the position, velocity, and acceleration of an object at several different times. The times are usually separated by equal time intervals. At each position, the object's velocity and acceleration are represented by arrows. If the acceleration is constant throughout the motion, one arrow can represent the acceleration at all positions shown on the diagram.
The motion diagrams for three common types of linear motion are described below.
Constant Velocity: The first motion diagram, shown in Fig. 1.1, is for an object moving at a constant speed toward the right. The motion diagram might represent the changing position of a car moving at constant speed along a straight highway. Each dot indicates the position of the object at a different time. The times are separated by equal time intervals. Because the object moves at a constant speed, the displacements from one dot to the next are of equal length. The velocity of the object at each position is represented by an arrow with the symbol v under it. The velocity arrows are of equal length (the velocity is constant). The acceleration is zero because the velocity does not change.
a = 0
Fig. 1.1. The motion diagram for an object moving with a constant velocity.
The acceleration is zero because the velocity is not changing.
Constant Acceleration in the Direction of Motion: The motion diagram in Fig. 1.2 represents an object that undergoes constant acceleration toward the right in the same direction as the initial velocity. This occurs when your car accelerates to pass another car or when a race car accelerates (speeds up) while traveling along the track. Once again the dots represent schematically the positions of the object at times separated by equal time intervals (delta t). Because the object accelerates toward the right, its velocity arrows increase in length toward the right as time passes. The product a (deltat ) = deltav ..represents the increase in length (the increase in speed) of the velocity arrow in each time interval deltat. The displacement between adjacent positions increases as the object moves right because the object moves faster as it travels right.
a = + constant
Fig. 1.2 A motion map for an object that is accelerating in the direction of its velocity. The velocity increases as time progresses.
Constant Acceleration Opposite the Direction of Motion: The motion diagram in Fig. 1.3 represents an object that undergoes constant acceleration opposite the direction of the initial velocity (this is sometimes called deceleration--a slowing of the motion). For this case the acceleration arrow points left, opposite the direction of motion. This type of motion occurs when a car skids to a stop. The dots represent schematically the positions of the object at equal time intervals. Because the acceleration points left opposite the motion, the object's velocity arrows decrease by the same amount from one position to the next. We are now subtracting deltav = a (deltat ) from the velocity during each time interval deltat.. Because the object moves slower as it travels right, the displacement between adjacent positions decreases as the object moves right.
a = - constant
Fig. 1.3 A motion diagram for an object whose acceleration points opposite the velocity. The magnitude of the velocity decreases as time progresses.
Motion Diagrams --1
a) Construct a motion diagram for a car traveling toward the left at decreasing speed. |
|
b) Construct a motion diagram for a bottle rocket whose burning fuel causes it to move vertically upward at increasing speed. |
|
c) Construct a motion diagram for the rocket in b) after its fuel is burned and it is still moving upward. |
|
Motion Diagrams--2
a) Construct a motion diagram for a skier moving at de-creasing speed up an incline.
|
 |
 | |
c) A block sits on a compressed spring. When the spring is released, the block is first pushed upward at increasing speed. After the block leaves the spring, it continues to move upward. Construct a motion diagram for the blocks trip |
Other Motion Diagrams:
 |
Does either ball pass the other? When?
Do they ever have the same velocity? When?
 |
One of the balls has a region of constant acceleration. Identify the ball and the region. Explain how you know the acceleration is constant.
Does one ball pass the other? Identify.
Is there an interval of time when both balls have the same velocity?
For the graph given at the right 3. a) Write a description of the motion. b) What is the acceleration of the object during the first 3 seconds? c) What is the total distance traveled by the object during the 5 seconds? d) Draw a motion diagram of the motion. |
|
4. Describe the motion along the path. Positions are shown in equal time intervals. Draw velocity vectors at five successive points along the path.

5. Describe the motion. Draw velocity vectors on each ball. What is common to all velocity vectors? Is the ball accelerating along the path? |
 |
Is the ball accelerating perpendicular to the path?
Describe the direction of the acceleration vector as the ball rolls down the path.
6. Sketch the motion diagram for the pendulum after it is released. Are the time intervals equal? Describe the velocity vector as the pendulum swings from left to right. Describe the acceleration vector along the path as the pendulum swings from left to right. |
|
Describe the acceleration vector perpendicular to the path as the pendulum swings from left to right.
GRAPHICALLY SUBTRACTING v's TO FIND DIRECTION OF a
The direction of an object's acceleration at some arbitrary time t 1 can be determined if we know its velocity at two different times separated by a short time interval deltat. The procedure is outlined and illustrated below.
Original velocity: Draw an arrow representing the velocity v1 of the object at time t1 .
![]()
New velocity: Draw another arrow representing the velocity v2 of the object a short time interval deltat later at time t2 .
![]()
Velocity change: To find the change in velocity delta v during the time interval delta t , place the tails of v1 and v2 together. The change in velocity delta v is a vector that points from the head of v1 to the head of v2. Notice in the figure that v1 + delta v = v2 or rearranging, delta v = v2 - v1 (that is, delta v is the change in velocity).

Another example:


Acceleration: The acceleration equals the velocity change delta v divided by the time interval delta t needed for that change; that is, a = delta v/delta t. If you do not know the time interval, you can at least determine the direction of the acceleration because it points in the same direction as delta v.
The key concepts of kinematics:
1. The velocity vector is always "along the path" of motion. Since we are defining the path of motion as our x-axis, the velocity vector never needs to be broken into components. In this sense we can say that all motion is one-dimensional. However our path exists in a three-dimensional world. Thus the path can change direction.
2. The acceleration vector can have components "along the path" and "perpendicular to the path". The acceleration component "along the path" causes changes in the length (magnitude) of the velocity vector. The acceleration component "perpendicular to the path" causes changes in the direction of the velocity vector.
Thus, at any point along the path of motion our coordinate frame of reference has one axis tangent to the path (our axis of motion) and two axes perpendicular to the path: one in the plane of curvature and one perpendicular to this plane. The acceleration component along the path can be in the same direction as the velocity vector, thus increasing the velocity magnitude, or in the opposite direction of the velocity vector, thus decreasing the velocity magnitude. The acceleration component perpendicular to the path will always point toward the center of curvature at that point and will have magnitude equal to v^2/R (v squared divided by R) where v is the magnitude of the velocity vector and R is the radius of curvature of the path at that point.
These key points are exemplified in the drawings below.
Exercises:
In each of the drawings below, sketch the object a short time (delta t) later and draw the velocity vector with the appropriate magnitude and direction. Break the acceleration vector into components "along the path" and "perpendicular to the path" and label components apath and aperp.
1.
|
2.
|
3.
|
4.
|
5.
|
6.
|
In each of the motion diagrams below, sketch the velocity and acceleration vectors on each ball. The position of the ball at t = 0 is indicated by label o.
Note that these diagrams can be dynamically produced using Interactive Physics where the vectors can also be displayed.
1. Ball rolling down slope. o |
2. Ball rolling down incline.
|
3. Pendulum
|
4. Constant acceleration along path
|

|
6. Constant Acceleration along the circle.
|

|
8. Simple Harmonic Oscillator
|
9. Projectile Motion
|
10. Orbital Motion (Ellipse)
|
11. Roller Coaster "Loop the Loop"
|
Creating Motion Diagrams Using Vectors:
Constant Acceleration Equations:
![]()

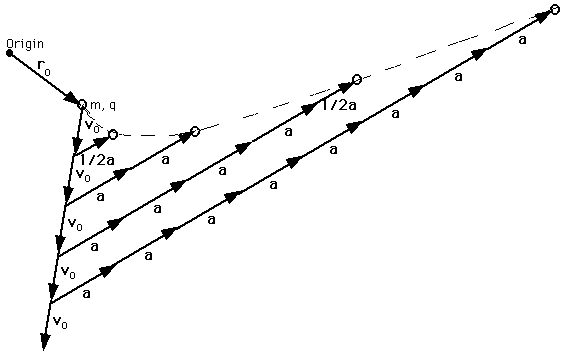
Solution:

Constant Acceleration Vector Exercises:
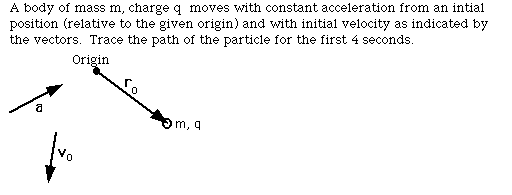
For each of the given sets of given vectors, determine the positions of the object that fit on the paper. Indicate the number of seconds that were needed. Choice of where you begin on paper makes a big difference.
1. vo = 0.
|
2.
|
3.
|
4.
|
5.
|
6.
|
7.
|
8.
|
Laboratory Experiments:
Physics Demonstrations and Experiments for High School:
Citation: G.E. Jones, "Physics Demonstrations and Experiments for High School". (Mississippi State University Physics Department, Mississippi, no copyright date noted). Permission granted by Mississippi State University Physics Department.
Keywords: Mechanics; Fluids; Waves And Sound; Heat And Thermodynamics; Electricity And Magnetism; Light And Optics; Laboratories; Laboratory Manual; Group Activities; Demonstrations; Lesson Plans
1. MEASUREMENTS OF SPEED AND DISTANCE (l)
Keywords: Conversion Of Units; Kinematics; Distance; Speed; Laboratories; Laboratory Manual; Group Activities; Demonstrations; Lesson Plans
Purpose: To obtain familiarity with the concepts and measurements of distance and average speed.
Materials: Stopwatch, measuring tape or meter stick.
Procedure:
Measure the distance between two arbitrary points on a nearby road. Determine the elapsed time of automobiles, bicycles, or pedestrians that pass between the two points. Obtain average speeds for three or more different objects. Express answers in feet per second and then convert to miles per hour.
2. USING ACCELERATION OF GRAVITY TO CALCULATE REACTION TIMES (l)
Keywords: Kinematics; Acceleration Due To Gravity; Distance; Laboratories; Laboratory Manual; Group Activities; Demonstrations; Lesson Plans: Low-cost
Purpose: To study the acceleration of gravity by using it to calculate reaction time.
Materials: One dollar bill, meter stick.
Procedure:
Hold a dollar bill lengthwise, so that it hangs vertically between another person's thumb and forefinger, placed about halfway up the dollar bill. Drop the bill. The other person cannot catch it, since his reaction time is too long.
To calculate his reaction time, repeat the experiment several times using a meter stick or ruler in place of the dollar bill. Test different students. Record the distance the meter stick travels before the person can catch it. Average the distances for each person and use the formula _x = 1/2 at^2 to calculate the reaction time for each person.
3. MEASUREMENTS OF HEIGHT AND THE ACCELERATION OF GRAVITY (l)
Keywords: Mathematics; Measurements; Trigonometric Functions; Error Analysis; Kinematics; Acceleration Due To Gravity; Distance; Free Fall; Laboratories; Laboratory Manual; Group Activities; Demonstrations; Lesson Plans; Low-cost
Purpose: To gain experience in making measurements, to make practical use of trigonometry, to experience the constancy of g, and to learn how to report error in experiments.
Materials: One 6-inch protractor, block of wood, measuring tape, assorted objects to drop.
Procedure.
A. Measurements of Height Using a Protractor.
Attach a small protractor to a block of wood. Attach a plumb line from the hole in the midpoint on the bottom rule of the protractor and let it hang down over the protractor scale. Line up the straight ruled edge of the protractor by sighting at the top of the building that you are determining the height of. The angle between the plumb line and the 90_ mark is the angle of elevation. Record this angle; measure the distance to the building and use the tangent of that angle and the measured distance to determine the height of the building. Be sure to add your height to the calculated height form eye-level to calculate the total height.
B. Investigation of Falling Objects.
Obtain at least four objects (some heavy, some light) made of different materials. Drop the objects from a high building or window, two at a time, simultaneously. Observe whether they strike the ground simultaneously.
C. Drop from the window or building top a single heavy object and measure the time with a stopwatch. Measure the height of the window as in Part A. Use these measurements to calculate the acceleration due to gravity from d = 1/2 gt^2. It is good training in error analysis to determine g five times and calculate the standard deviation and the standard deviation of the man. (See the discussion under Experiment 23.)
D. Use the textbook value of g and make time measurements to calculate the height of the window from h = 1/2 gt^2. Compare the value of h from part A.
4. COEFFICIENT OF FRICTION (l)
Keywords: Dynamics; Free Body Diagrams; Friction; Normal Force; Laboratories; Laboratory Manual; Group Activities; Demonstrations; Lesson Plans
Purpose: Top study friction, the factors that influence it, and to determine the coefficients of friction for several surfaces.
Materials: Spring balance, different types of rigid flat surfaces, meter stick, weights, a wooden block with a hook, and a metal block with a hook.
Procedure:
A. If the angle q is increased until the object will just slide without accelerating, then the force is given by fs = mg sin q. The coefficient of friction mu is defined by f/FN.
Since FN = mg cos q, or mu = (mg sin q)/(mg cos q) or mu = tan q.
Therefore, we can determine mu by allowing the block to slide at a uniform speed down the incline. The angle can be determined either by using an incline equipped with a protractor or by simply elevating a smooth board at one end by some means.
B. Since mu = f/FN we can find mu by determining the values of the frictional f and FN. Attach a spring balance to the object and pull the object at a constant speed, making sure that the spring balance is held parallel to the surface.